Let's Get Coding!
|
Learning an entire new language, especially a digital one, can be a little intimidating at first. But, if you want to create amazing webpages, you must first learn the very basics. In this course, we are going to create a simple webpage using the multitude of tags that HTML5 has to offer.
Now, these webpages will be absolutely ugly, but do not get discouraged. An HTML document is only the bones of a webpage, and we would need another language known as CSS to form the skin. We are not covering style or design in this overview, but we are going to form a nice, sturdy foundation for your webpages. |
Setting Up An HTML Document
|
Okay! So, now that you have a little background information, we can start playing with HTML! Before we can write our content, however, we need to set up the heading of the HTML document. This is a very important step, as this section is what determines how the browser is going to read the language of the document.
This is how an HTML5 document should be set up. |
<!doctype html>
<html>
<head>

<meta charset="UTF-8">
<title>Untitled Document</title>
</head>

<body>

  </body>


</html>
See the Pen myNyEq by Jamie (@jamieF123) on CodePen.
|
So, let’s break down what we are seeing here.
|
Task
|
1. Take a look at the code and try to understand what each tag does for the document.
2. Change the title of your webpage! |
Headings
|
Now that we filled in the more technical aspects of our HTML document, we can start creating our website content. In between the body tags, we are going to use the <h1></h1> element in order to create a heading for our page.
|
|
Here are some quick tips when using heading elements:
There are actually six different types of heading tags, and each one varies in size.
As you can guess, the <h1> tag creates the largest heading and <h6> creates the smallest. 
Task
|
Click on the HTML tab to see the code
See the Pen YPmjgW by Jamie (@jamieF123) on CodePen.
Divs
|
The <div> tag is often used to create different sections in an HTML document. Anything can be placed inside a div! Headings, paragraphs, images, and more can all be nested inside of a div. You can even place multiple <div> tags within other <div> tags!
|
|
Things to remember:
|
Task
|
1. Place an opening and closing div tag before and after your header tags.
|
Click on the HTML tab to see the code
See the Pen qEeyed by Jamie (@jamieF123) on CodePen.
Paragraphs
|
The paragraph element is a very useful component of an HTML document. In between the opening and closing paragraph tags is where you can write statements of any length!
|
|
Reminders
HTML text editors do not read white space. This means that you can have any amount of space in between words or tags, and the browser will still read the document in the same way. |
So, writing this...

Is the same as writing this...

Task
|
1. Create two paragraph tags inside one new <div> tag.
2. You can write whatever you want, but just be sure that the two paragraphs are inside the same div! |
Click on the HTML tab to see the code
See the Pen gbVdpx by Jamie (@jamieF123) on CodePen.
Ordered and Unordered Lists
|
Okay, so now we have some content on our webpage that is organized into headings, paragraphs, and divs. But, let’s take a look at how to organize content in a list format! Lists are especially important when you want to write short, to-the-point statements on your webpages that viewers can easily skim. The ordered list element creates a numbered list of items, while the unordered list element displays items in a bulleted format.
|
|
About <ol>, <ul>, and <li>:
|
Task
|
1. Create an ordered list within a separate div that contains three list items.
2. Next, create an unordered list within the same div as the ordered list that contains four list items. |
|
Tips
|
Click on the HTML tab to see the code
See the Pen gbVdPG by Jamie (@jamieF123) on CodePen.
Embedding a Hyperlink
|
Links are an essential part of any website because they lead viewers to related webpages, videos, and images. The <a> tag tells the browser to lead a viewer to another source when they click on the link.
|
|
About the <a> tag:
This is the structure of a hyperlink tag: |

|
Task
|
1. Create a hyperlink inside of a new div tag
2. You can copy and paste a link to any website |
|
Tips
|
Click on the HTML tab to see the code (try opening the link in a separate tab)
See the Pen YPmOGZ by Jamie (@jamieF123) on CodePen.
Embedding an Image
|
Even though our webpage is a little dull, we can always add a few images to make it look a little better! The <img> links to images in a similar way as the <a> tag links to other webpages.
|
|
Things to Know About Images
Here is the structure of an <img> tag: |

|
Task
|
1. Create a new div tag and embed two images of your choice.
2. Try linking an image that you find on the Internet. This way, the browser will easily be able to find it. 3. In order to find the URL of an image on the Internet, right click on the image and select the “Copy Image URL” option. Then, just copy and paste the link in the “src.” 4. Try resizing the images. |
|
Tips
|
Click on the HTML tab to see the code
See the Pen dPxqWN by Jamie (@jamieF123) on CodePen.
Turning an Image into a Hyperlink
|
Now that we added a little more color into our webpage, we can combine our knowledge of links and images in order to turn an image into a link! All we have to do is apply what we have learned in the previous sections.
|
|
Let’s Review:
In order for a link to work, we need…
Here is what the code should look like: |

Task
|
1. Turn one of your images into a link or add another link with a new image!
2. Test out your link in a browser! |
See the Pen RNXYLL by Jamie (@jamieF123) on CodePen.
Tables
|
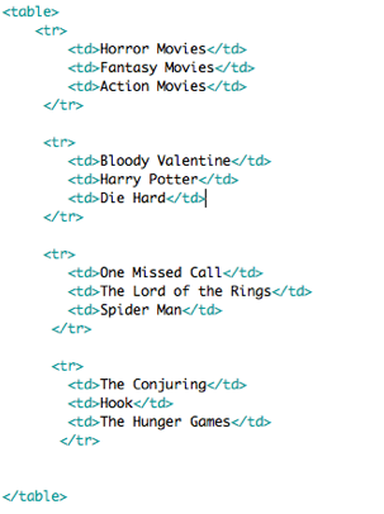
So, now we have images, links, headings, paragraphs, and divs on our simple webpages. However, we are still missing tables! The <table> tag is a helpful element to display information on the web.
|
|
How the <table> tag works:
Here is the structure of a table element: |
Task
|
1. Create a table with three rows and three columns.
2. Place this table into a new div. |
|
Tips
|
See the Pen vEozde by Jamie (@jamieF123) on CodePen.
The Power of HTML
Congratulations! You now have a basic understanding of how to format the structure of an HTML document. Keep practicing with these steps until you feel comfortable enough to move on to styling with CSS. Be proud of your simple, ugly webpage because this is only the beginning! With a lot of hard work and practice, you can be on your way to creating amazing things for the web!
Here is the code for you to reference later!
Here is the code for you to reference later!
<!doctype html>
<html>
<head>

<meta charset="UTF-8">
<title>Untitled Document</title>

</head>

<body>


<div>
	<h1>Heading 1</h1>
        <h2>Heading 2</h2>

</div>

<div>
        <p>I like creating unnecessary space in my paragraphs. I also really like learning how to code using HTML! I am really excited to be writing this paragraph because I am learning how to create content for my webpage!</p>

        <p>This is my second paragraph.

</div>

<div>
	<ol>
    	<li>Tomatoes</li>
        <li>Milk</li>
        <li>Cereal</li>
     </ol>

     <ul>
     	<li>Soap</li>
        <li>Butter</li>
        <li>Water Bottles</li>
        <li>Paper Towels</li>
      </ul>
</div>

<div>

	<a href="https://www.google.com/">Google</a>

</div>

<div>

	<img src="https://encrypted-tbn3.gstatic.com/images?q=tbn:ANd9GcTmQF0JbHIJ6m05yuRGzVZ5d_V3iVijF3AHoqhI71OTgRnsCZijBw" alt="Daisies" width="600" height="400">

   <a href="http://google.com"><img src="http://dbmlag.info/wp-content/uploads/2014/06/white-anemone-flowers-cream-anemone-flower-by-flowerbazaar-on-etsy--photos.jpg" alt="Pink Flower" width="600" height="400"></a>

</div>

<div>
<table>
	<tr>
    	<td>Foods</td>
        <td>Drinks</td>
        <td>Restaurants</td>
     </tr>

     <tr>
     	<td>Pizza</td>
        <td>Water</td>
        <td>McDonald's</td>
     </tr>

     <tr>
     	<td>Hot Dogs</td>
        <td>Soda</td>
        <td>Panera Bread</td>
      </tr>

      <tr>
      	<td>Soup</td>
        <td>Lemonade</td>
        <td>Burger King</td>
       </tr>

</table>
</div>

</body>
</html>
See the Pen ZYgMoE by Jamie (@jamieF123) on CodePen.
